Notice: System maintenance will be performed on Saturday, April 27, 2024, from 6:00 a.m. until 1:00 p.m. MST

Some or all areas of the website may be unavailable during this maintenance period.

OCAP Frequently Asked Technical Questions

Please Note

This page is for answers to commonly asked technical questions.
If you have legal or procedural questions, contact the Law Library.  


 Remember that OCAP does not file your case electronically. 
You will need to print out your documents and file them directly with the court.

I use a screen reader that doesn't seem to be compatible with OCAP. Contact selfhelp@utcourts.gov. We will make arrangements to assist you remotely.

Click on the questions below to see the answers. 

My problem is...

Permissions Error

If you receive the "Error: you do not have permission to see this page" message:

Click the Home button in the upper right corner of your OCAP account:

This has been found to work for most users. Please note that you may also receive the permissions error message above when you click on the "Save and Exit" button while in your interview. Click on the Home button as shown above to go to your account. Your interview has been saved.

If clicking the Home button does not clear the error message, please try the following solutions:

If you have been working on an interview, it may have timed out because there was a pause in entering information. Go to the Home link and open your interview again.

Using a private viewing browser window (ie. incognito window) may also work. For most browsers, you can access this one of two ways. Either by using the options menu typically found in the upper right hand corner of the browser or by using a quick key sequence. Here are instructions to access a private viewing browser window (go incognito) in commonly used browsers:

In Chrome:

  • Use the three dots in the upper right hand corner of the Chrome Browser, and choose "New incognito window" from the drop down menu
  • -OR- use CTRL+SHIFT+N

In Firefox:

  • Use the three lines in the upper right hand corner of the Firefox Browser, and choose "New Private Window" from the drop down menu
  • -OR- use CTRL+SHIFT+P

In Microsoft Edge:

  • Use the three dots in the upper right hand corner of the Microsoft Edge Browser, and choose "New InPrivate window" from the drop down menu
  • -OR- use CTRL+SHIFT+P

In Internet Explorer:

  • Use the cog icon in the upper right hand corner of the Internet Explorer Browser, highlight "Safety," and choose "InPrivate Browsing" from the drop down menu
  • -OR- use CTRL+SHIFT+P

Once you have opened the private viewing browser window, go to https://www.utcourts.gov/ocap/ and log into your OCAP account.

If the suggestions above do not resolve the issue, try one or more of the following:

  • Clear your cache and cookies, then restart your browser.
  • Try different browsers.
  • Try different computers from different locations.

If you are still receiving this error message after trying these suggestions, please email selfhelp@utcourts.gov to let us know, Monday – Friday 11:00 am – 5:00 pm.
Accessing My Account

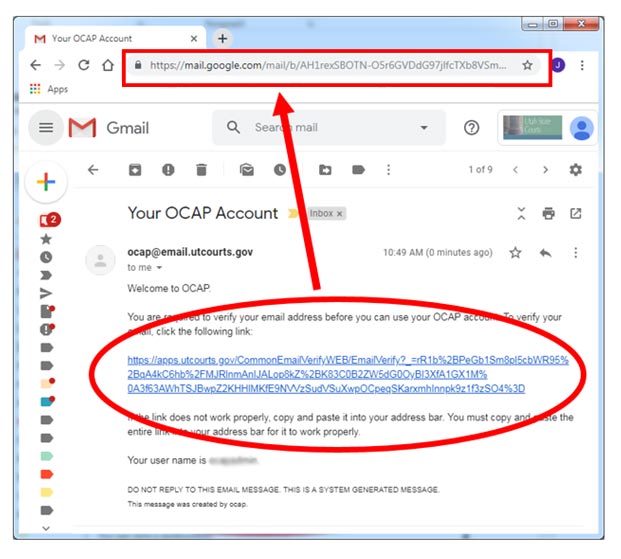
If you are unable to click on the link in the email sent to you, you can verify your email by going to the URL instead. You will need to copy the entire URL and paste it into the address bar in your browser. The address bar is where you would normally type out a URL to a website, such as www.utcourts.gov.

In the example below, you would copy the entire blue link in the circle, and paste it in address bar located in the red box. 

If you don't see the email in your inbox, you may need to check your spam folder for this email. Add ocap@utcourts.gov and ocap@email.utcourts.gov to your whitelist to avoid OCAP emails from being filtered to your spam folder.

You can also have the email resent to you by trying to log in to the OCAP website (https://pubapps.utcourts.gov/OcapWEB/LoginServlet). When you do this, it will inform you that you have not verified your email address and ask if you need the email sent to you again. Be sure to check the email address we are sending the email to is right and also spelled correctly before you send another verification email. You can update the email address before sending the verification email if you need to.

If neither of these options work, you may need to create a new email address and/or OCAP account to receive the email.


Forgot Password

If you cannot remember your password but know your login information, use the "Forgot Password?" link on the login screen. You will need to enter your User Name and email address you used to set up the account to reset your password.

Forgot User Name

If you have forgotten your User Name, click on the "Forgot User Name?" link on the login screen. You will need to enter the email address you used to set up your account. You will receive an email with your User Name.

Exceeded Login Attempts

If you have exceeded the number of login attempts and locked your account, use the "Forgot Password" link on the login screen.

If you no longer have access to the email address and have forgotten your login information, you will not be able to retrieve the login information for your account. A valid email address which you have access to is required to use the "Forgot Password" and "Forgot User Name" features. You will need to create a new OCAP account with a valid email address which you have access to.

New accounts require that you verify your email address. You will receive an email with a link to verify your email address. You may need to check your spam folder for this email. Add ocap@utcourts.gov and ocap@email.utcourts.gov to your whitelist to avoid OCAP emails from being filtered to your spam folder.

This problem is usually caused when the information fields are not filled in properly. Check to make sure that you have done the following:

  • Do not use your browser's Autofill feature. If you use your browser's Autofill feature, your information may not be properly recognized and the 'Create' button will not work. Hand type in all information in all the required fields.
  • Make sure the User Name is one word, no spaces.
  • Make sure the information in the two fields for email address match.
  • Make sure the information in the two fields for password match.
    • The Password must be between 6 and 20 characters long.
    • The Password must also include at least one number, one upper case letter, and one lower case letter.
      (examples: 23gW4567, scatCat34, 67Smith)
  • Make sure every field with a red asterisk has been filled in.
  • Make sure there are no fields outlined in red.
  • Make sure the checkbox at the bottom indicating that you agree to the "User Agreement and Privacy Policy" has been checked.

If you have attempted and failed to log in seven times, your only option is to reset your password. To reset your password, click on the "Forgot Password" link on the login screen.


Our system is set up so that if an account has not been logged into for more than 450 days, then that account and any interviews associated with that account are deleted. This is to protect users from having their personal information on our systems indefinitely. We cannot retrieve any account or interview that has been deleted. You can set up a new OCAP account using the same username and email address.

A Bad User Name or Password

Usually this happens when you enter in an invalid User Name or Password. You should see an error message telling you that this has happened.

Cookies are Disabled

If you are returned to the login screen without an error, then you may not have cookies set to be accepted by the OCAP page. Cookies need to be enabled to use the Online Court Assistance Program. Resources for enabling cookies:


My Interview

When you select YES on both of the Protected Address questions (on the screen and then later select your protected address as the current address for your child), the interview locks down the questions so your protected address won't unintentionally be revealed.

To unselect a protected child and petitioner address:

  1. Go to the children screen entitled: Children – (name of child).
  2. Change the current address selection from your protected address to "I need to enter the current address." Then change the answer to NO on the question "Do you need to have the current address for (name of child) safeguarded?" If you have more than one child associated with your protected address, you must repeat both of these changes for each child.
  3. Return to the Protect Address – (name of petitioner) screen and change the answer to the question "Does (Petitioner) need to have his address protected because he is the victim of abuse? to NO.

If you receive the "Error: you do not have permission to see this page" message:

Click the Home button in the upper right corner of your OCAP account:

This has been found to work for most users. Please note that you may also receive the permissions error message above when you click on the "Save and Exit" button while in your interview. Click on the Home button as shown above to go to your account. Your interview has been saved.

If clicking the Home button does not clear the error message, please try the following solutions:

If you have been working on an interview, it may have timed out because there was a pause in entering information. Go to the Home link and open your interview again.

Using a private viewing browser window (ie. incognito window) may also work. For most browsers, you can access this one of two ways. Either by using the options menu typically found in the upper right hand corner of the browser or by using a quick key sequence. Here are instructions to access a private viewing browser window (go incognito) in commonly used browsers:

In Chrome:

  • Use the three dots in the upper right hand corner of the Chrome Browser, and choose "New incognito window" from the drop down menu
  • -OR- use CTRL+SHIFT+N

In Firefox:

  • Use the three lines in the upper right hand corner of the Firefox Browser, and choose "New Private Window" from the drop down menu
  • -OR- use CTRL+SHIFT+P

In Microsoft Edge:

  • Use the three dots in the upper right hand corner of the Microsoft Edge Browser, and choose "New InPrivate window" from the drop down menu
  • -OR- use CTRL+SHIFT+P

In Internet Explorer:

  • Use the cog icon in the upper right hand corner of the Internet Explorer Browser, highlight "Safety," and choose "InPrivate Browsing" from the drop down menu
  • -OR- use CTRL+SHIFT+P

Once you have opened the private viewing browser window, go to https://www.utcourts.gov/ocap/ and log into your OCAP account.

If the suggestions above do not resolve the issue, try one or more of the following:

  • Clear your cache and cookies, then restart your browser.
  • Try different browsers.
  • Try different computers from different locations.

If you are still receiving this error message after trying these suggestions, please email selfhelp@utcourts.gov to let us know, Monday – Friday 11:00 am – 5:00 pm.

Auto Delete Option

If there is an auto delete feature at the bottom of the screen, that is the only way you should delete that screen. This will delete the entire section of screens. Any information that you want to keep will need to be re-entered.

Erase Individual Answers

The best way to erase an answer is to place your mouse over the answer until a gray circle with an 'x' in it appears to the right. Click that circle. This will erase the answer from the screen and from your documents. (Note - Trying to remove a typed in answer by highlighting it and hitting your 'delete' key may still leave that answer in your interview and cause problems later in your documents.)

If you need to change answers on several different pages, start erasing your answers on the last page you are changing. Then work your way backward through each screen until you have erased all the information you don't want in your documents. (If you don't start at the end and work your way back through each screen, unwanted information may appear in your interview and documents.

Working backwards and deleting your answers using Erase Answers/Circle X is the best way to make sure that unwanted information does not appear in your documents, except for those screens with an auto delete feature as described below.

Special Things to Note:

Please be aware that some Yes/No questions and choices may open up other features. If the answer has been changed or the feature is automatically populated, you will need to open the feature and delete what's in it first, then delete the Yes/No question or choice. You may want to click 'Yes', 'No', and any other choices for an answer to see if there are any hidden fields for this question. Those fields must be cleared before clearing the Yes/No question or choice which shows the field. If the Yes/No question or choice opens up a link, you should click on the link and clear all of the questions for the screen(s) that open up before you delete the Yes/No question or choice.

Right-click in the center of the screen with the error message and choose "Refresh," "Refresh Frame" if in Internet Explorer, or "Reload Frame" in other browsers. This should correct the issue. If it does not, then delete your temporary internet files and try again.

This typically happens because of a security setting in your browser, firewall, or other security software. You may want to review those settings to resolve this issue.

However, we have fournd that trying a different browser is the easiest way to correct the error. You can also try different computers from different locations.

This error was caused by a software upgrade on our server which affected several of our OCAP interviews. We have worked with the vendor and have applied the patch they provided. If you are still seeing this error, you will need to log out of OCAP, clear your cache and cookies, then try again. This has worked for people so far. Be sure and close/quit the browser and restart it after clearing the cache and cookies. Here are instructions to clear cache and cookies in a few of the common browsers:

In Chrome:

  • Use the three dots in the upper right hand corner of the Chrome Browser, and choose "More tools," then "Clear browsing data…" from the drop down menu
  • -OR- use CTRL+SHIFT+DELETE

In Firefox:

  • Use the three lines in the upper right hand corner of the Firefox Browser, and choose "Options" from the drop down menu. Select "Privacy & Security" from the left side menu, then scroll down to "Cookies and Site Data." Click "Clear Data…," select both checkboxes, and click "Clear."
  • -OR- use CTRL+SHIFT+DELETE

In Microsoft Edge:

  • Use the three dots in the upper right hand corner of the Microsoft Edge Browser, and choose "Settings" from the drop down menu. Scroll down to the "Browsing data" section and click "Choose what to clear." Select the top four boxes and click "Clear."
  • -OR- use CTRL+SHIFT+DELETE

Additional instructions for these and other browsers can be found at: https://its.uiowa.edu/support/article/719

Another option is to try using a different browser or different computer. If you choose to do this, keep in mind that you (or someone else if using a different computer) may have the same cached files, and you may still need to clear the cache and cookies.

Using a private viewing browser window (ie. incognito window) may also work. For most browsers, you can access this one of two ways. Either by using an options menu typically found in the upper right hand corner of the browser, or my using a quick key sequence. Here are instructions to access a private viewing browser window in a few of the common browsers:

In Chrome:

  • Use the three dots in the upper right hand corner of the Chrome Browser, and choose "New incognito window" from the drop down menu
  • -OR- use CTRL+SHIFT+N

In Firefox:

  • Use the three lines in the upper right hand corner of the Firefox Browser, and choose "New Private Window" from the drop down menu
  • -OR- use CTRL+SHIFT+P

In Microsoft Edge:

  • Use the three dots in the upper right hand corner of the Microsoft Edge Browser, and choose "New InPrivate window" from the drop down menu
  • -OR- use CTRL+SHIFT+P

In Internet Explorer:

  • Use the cog icon in the upper right hand corner of the Internet Explorer Browser, highlight "Safety," and choose "InPrivate Browsing" from the drop down menu
  • -OR- use CTRL+SHIFT+P

Once you have opened the private viewing browser window, go to https://www.utcourts.gov/ocap/ and log into your OCAP account.

If you have browser extensions installed, they may be interfering with how OCAP is displayed in your browser and cause this error to occur.

If you are still receiving this error message after trying these suggestions, please email selfhelp@utcourts.gov to let us know, Monday – Friday 11:00 am – 5:00 pm.


Other Problems

∗ The solution that should most often work is to right-click on your document and choose "Save as" or "Print" from the menu that appears.

If right clicking as described above does not work, here are additional solutions that may fix the problem:

The toolbar is hidden.

Press the F8 key to toggle the toolbar between being shown and being hidden.

The toolbar is shown, but the icons are hidden.

To display the save and print icons:

  1. Right click on the gray toolbar above your document
  2. Choose File --> Print (to display the Printer icon)
  3. Choose File --> Save a Copy (to display the Save icon)
You're seeing the "Read Mode" display.

To display the save and print icons:

  1. Open Adobe Reader
  2. Choose Edit --> Preferences --> Internet
  3. Uncheck "Display in read Mode by default"
  4. Then press OK.

One of these solutions should correct the problem.

Contact us at selfhelp@utcourts.gov. We will check your documents to determine the problem. Please include the email address on your OCAP account and your OCAP User Name in your email.

This happens when there is a connection problem between your computer and the OCAP server.

If you receive this error, click the "Home" button at the top right of your screen. Select the interview you were working on. You should then be able to continue your interview.

First, verify that you have Adobe Acrobat Reader installed. Adobe Acrobat is required to view your completed documents.

If you have Adobe Acrobat installed, verify that it is the default program for viewing PDF files. To manually check and/or change the default file types in Windows:

  • Double-click My Computer or select it from the Start menu.
  • Choose Tools > Folder Options, and then select the File Types tab.
  • Locate the PDF extension in the list and click Change.
  • Select the version of Acrobat or Adobe Reader that you would like to use as the default viewer and click OK.
  • Click OK to close the Folder Options window.

More information about setting Acrobat as the default reader can be found here:

Acrobat Help / Wrong viewer opens

If you have not accessed your interview in the last 400 days, it may have been removed and no longer available. Occasionally the interview will still show in your account and display an error (Error 51) when you try to access it. When this happens, you will need to create a new interview and fill out the information again.

Please send us an email detailing the issue you are having. We will respond it is as soon as possible. Contact OCAP